Sunday 31 May 2015

Setup Kali Linux In Raspberry Pi And Android Device As Screen & Input

Kali Linux In Raspberry Pi And Android Device As Screen & Input- picateshackz.com

Before we begin, Let me give you an introduction about what is inside this article. as the title said it is all about Raspberry Pi, a Raspberry Pi is a low budget (30$), small credit-card sized ARM board that acts as a computer, and it can connect to TV, Laptop screen and desktop monitor. The Pi is popular among hobbyists and educators due to its low cost, simplicity, and versatility of applications, So how it will useful for Penetration testing or Ethical hacking by installing hacker's OS Kali Linux on it. well, this complete step by step guide will teach you how to install Kali linux in Rapberry Pi and how to use an Android device as its screen and input.


What is Raspberry Pi?


The Raspberry Pi is a low cost, credit-card sized computer that plugs into a computer monitor or TV, and uses a standard keyboard and mouse. It is a capable little device that enables people of all ages to explore computing, and to learn how to program in languages like Scratch and Python. It’s capable of doing everything you’d expect a desktop computer to do, from browsing the internet and playing high-definition video, to making spreadsheets, word-processing, and playing games.


What’s more, the Raspberry Pi has the ability to interact with the outside world, and has been used in a wide array of digital maker projects, from music machines and parent detectors to weather stations and tweeting birdhouses with infra-red cameras. We want to see the Raspberry Pi being used by kids all over the world to learn to program and understand how computers work.


Installing Kali Linux 1.1.0 on the Raspberry Pi 2


There is no official Kali support for the Raspberry Pi 2 with working images, and Kali 1.1.0 support, I wanted to find out if it was possible to get Kali 1.1.0 working on the latest Raspberry Pi 2 and the steps needed.

The Raspberry Pi 2 is small and low powered enough to be used as a penetration testing "drop box". It's a simple but fairly powerful device that can be inconspicuously plugged into a network and provide a penetration tester with the means to perform remote tests.

Specifications


Raspberry PI 2

The Raspberry PI 2 has significantly improved specifications compared to the Raspberry PI model B+, being approximately six times faster and having twice the memory.

The quick specifications are:-

900MHz quad core ARM Cortex-A7 CPU (~6x performance)

1GB RAM

4 port USB

10/100 Ethernet port.


Kali Linux 1.1.0

Kali Linux 1.1.0 was released on the 9/2/2015, and was described as a milestone release. With a new kernel patched for Wireless injection attacks, and improved wireless driver support.

Building a Kali Linux 1.10 image for the Raspberry Pi 2

A sample workflow would look similar to (armhf):


And slightly modified the workflow to the below:-

mkdir ~/arm-pi2
cd ~/arm-pi2
git clone https://github.com/offensive-security/gcc-arm-linux-gnueabihf-4.7
export PATH=${PATH}:/root/arm-pi2/gcc-arm-linux-gnueabihf-4.7/bin
git clone https://github.com/offensive-security/kali-arm-build-scripts
cd ~/arm-pi2/kali-arm-build-scripts 


Then download the Raspberry Pi 2 kernel configuration, to the current folder (kali-arm-build-scripts) using the following command:-

wget http://pastebin.com/download.php?i=Rv3zpsiv -O pi2_kernel.config


Then modify the rpi.sh script as below:-


Replacing "armel" above with "armhf" as below, as the Raspberry PI uses the armhf architecture.


Then continue to modify the rpi.sh file to load the new kernel configuration as below, and then save the modified rpi.sh to disk. (with vi :wq).


Then ran./build-deps.sh

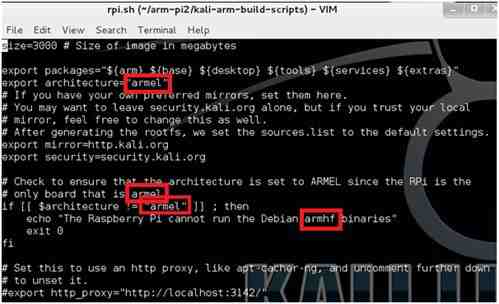
And built the image using version 1.1.0 of Kali Linux:

./rpi.sh 1.1.0


The image file kali-1.1.0-rpi.img,xz was produced:-


For the next steps i am used a Windows laptop with a built in SD card reader, to write the created img to a high capacity SDHC card.

Extract the xz file to an img file using the Windows 7-zip program, and then use "Win32 Disk Imager" to write the img to the SDHC card. 


The Linux equivalent would be to use the unxz utility to decompress the xz file, followed by a similar command:

 - dd if=kali-1.1.0-rpi.img of=/dev/sdb bs=512k


Configuring Kali Linux on the Raspberry Pi 2.


Expanding the image to the size of the flash card

Insert the written SDHC card in the Raspberry Pi 2, and made the other necessary connections like attaching a keyboard/monitor/mouse and plugging a DHCP enabled network cable into the Raspberry Pi. And then powered the Raspberry Pi up, logging in using the default credentials root/toor:- (we suggest changing the password).


As i wanted to use the full flash SD card size, as the full kali Linux build which i want to install is too big for the default image, So i am then expanded the image to the full size of the flash SD card, using the following commands :
/scripts/rpi-wiggle.sh
However the sudo and parted programs were missing, so we had to use apt-get to install them:-
apt-get install sudo
apt-get install parted
Then the rpi-wiggle.sh program was able to run:-
/scripts/rpi-wiggle.sh

After this the Raspberry Pi will be reboot, Now ready for the full Kali build to be installed.

Installing the Full Kali Linux build


Now it is time to install the full Kali Linux build, by issuing the following commands:-

apt-get update
apt-get install kali-linux-full

After downloading and installing files, and answering a number of configuration screens, the installation will be completed and the command prompt will display:


Installing and configuring the SSH server


The next step is install and configure the SSH server. Though chkconfig first:

apt-get install chkconfig
Then remove the run levels for SSH:
update-rc.d -f ssh remove
And then load the SSH defaults to run level:
update-rc.d -f ssh defaults
Next, check that the SSH server was up and running:
chkconfig ssh
I suggest removing the default keys for the SSH server:
rm /etc/ssh/ssh_host_*
Then create a new set of public and private keys:
dpkg-reconfigure openssh-server
Now restart the SSH server:
service ssh restart

You are done. 

Note: I am used a SDHC for compatibility sake, which limited me to a maximum capacity of 32GB. Where possible select cards which have wear levelling, which distributes the writes across the memory, extending the life of the flash media. Finally i am used high speed media, selecting manufacturers from a published Raspberry Pi compatibility guide http://elinux.org/RPi_SD_cards


Use Android Device as Screen and Input for Raspberry Pi


Got an Android device? Want to use it as a screen and keyboard for Raspberry Pi? A simple trick described in a thread on the Raspberry Pi forum site can help you with that.

For this trick to work, you need an Android device that supports USB tethering and VX ConnectBot app installed on it.


What this does:

1. Allows you to use your Android device as keyboard input and terminal display for your Raspberry Pi

2. Allows you to tether your Raspberry PI to your Android device's WiFi (3G untested, but should work).


Assumptions:
  • Your PI is configured to run SSHd on startup
  • You are using the default Pi username / password
  • Your Android device has internet connectivity via WiFi/3G and it is enabled

How to do it:


On Raspberry Pi, run the sudo nano /etc/network/interfaces command, and add the following configuration to it:
iface usb0 inet static address 192.168.42.42 netmask 255.255.255.0 network 192.168.42.0 broadcast 192.168.42.255
This effectively turns the first USB port into a network interface. Reboot Raspbery Pi.

Now follow the steps:

1. Power down your Pi

2. Connect your Android device to your Pi via it's USB data cable

3. Power up your Pi... wait about a minute.

4. On your Android device, go to Settings / Wireless & Networks / More / Tethering & Portable Hotspot... click "USB tethering"

5. Start up VX ConnectBot and SSH "pi@192.168.42.42"

6. Keep hitting return until it asks you for your password. Enter it.

Congratulations - you should now have terminal access to your Pi with a software keyboard... kinda. Mine seems to disconnect the session every minute or so - very annoying.

Now to set up routing so that your Pi can see the world via your Android device.

7. Root yourself up

sudo su -


8. Check to see which IP address that your Android device is using
arp -a
mine is 192.168.42.129

9. Add a default route pointing all traffic from your Pi out to your Android device. It's worth noting that this static route is temporary and will not survive rebooting your Pi. I've left it like this because I don't know if Android likes to change it's tether gateway address very often. 

If you've gotten this far, I'll assume you can figure out how to make a static route permanent if need be..
route add default gw 192.168.42.129 usb0

10. Test it!
ping http://www.google.com

Top Android Apps For Advanced Usability With Raspberry Pi 


Ever found yourself plugging a keyboard into your Raspberry Pi because you could be bothered to boot your PC to SSH, or found yourself desperately trying to remember the tiny computer’s IP address on your network?

There are a whole host of Android utilities that can be used by Raspberry Pi owners to make life easier, including a couple that are custom designed.

I have collected some of them together, all of which are free to install to Android phones and tablets.


Hacker’s Keyboard

The standard Android keyboard isn’t really any good for entering command line instructions (something you’ll probably need to do if connecting over SSH to your Raspberry Pi device) which is where the Hacker’s Keyboard comes in handy. Arguably more useful on devices with a larger screen or tablets, this app offers a standard keyboard layout for Android, with all of the characters — alpha-numeric and punctuation — where you would expect to find them.

muo-android-pi-apps-kb
Also featuring Tab, Ctrl, Esc, and arrow keys, Hacker’s Keyboard will probably prove vital for communicating with your Pi from your Android phone or tablet. At the very least it should save you some time. Many international keyboard layouts are included, while the developer has also provided international dictionaries as optional plugins should you wish to use Hacker’s Keyboard more widely.

AndroidVNC

Rather than sending files by FTP or gaining command line access through SSH, what if you needed to setup a remote connection to the GUI in Raspbian or some other Pi distro?

muo-android-pi-apps-vnc
To start with, you would need to have TightVNC installed on your Raspberry Pi. This will accept the connection, but to get a reproduction of your Raspberry Pi desktop on your Android device, you’ll need AndroidVNC.

With a keyboard and a settings screen to manage how the mouse behaves and to send special keys (such as CTRL-ALT-DEL), AndroidVNC simplifies what might otherwise be a complicated mess of options. Not so great for smaller screens, AndroidVNC is perfect for phablets and tablets.

Fing


  • You’ve just switched on your Raspberry Pi but you forgot to connect the HDMI lead, so you have no display. You don’t want to pull the plug, but you can’t ssh into it without the ip address. How to find it? Or…
  • You got your headless Raspberry Pi up and running, but you forgot what ip address it’s on. Or…
  • You rebooted your internet router and it’s changed the ip address of the Pi. What do you do?

You install Fing on your phone and use it to scan your whole network and tell you the ip and mac addresses of every connected device.

Very useful indeed. There’s no looking back once you’ve got Fing installed. It’s a superb app. You can assign names to each device and choose an appropriate icon to make identification easier. They recently added a Raspberry Pi icon too…

Thursday 28 May 2015

How To Setup Free VPN Service On Kali Linux For Anonymity

Setup Free VPN Service On Kali Linux- picateshackz.com

Virtual Private Networks (vpn) create an encrypted ‘tunnel’ between your computer and the host server, with the internet traffic going in and out of the host server. Your ISP or government can only see that you have connected to the VPN server and nothing else – your activities, IP addresses you have visited etc. are all completely hidden from them behind a minimum of 128-bit encryption, So in this tutorial you will be able to know how to setup free VPN service on Kali Linux and how possible is complete anonymity in cyber world.

However, the VPN server can see what you get up to on-line, which is why we feel it vital that a good VPN provider to keeps no logs. Anything less, and its users’ activities may be compromised (thus making the precaution of using a VPN in the first place redundant!).

Although setting up VPN does usually involve downloading and installing a VPN client, or otherwise configuring your computer or mobile device, the computing skills needed are minimal, and most providers supply detailed step-by-step setup guides in any case. One good thing is that once set up, all your internet activity, no matter which program you use, is now safely routed through the VPN.

The best vpns are those that keep no logs. The premise is that if the VPN provider receives a legal request from LE to provide details of who did what and when, they cannot point the finger at a particular user if they have no logs. This is the latest, most reliable (imo) list of such paid VPN providers: http://torrentfreak.com/which-vpn-services-take-your-anonymity-seriously-2014-edition-140315/


Why use VPN?

Here’s 11 reasons why you would want to use VPN services.
  • VPN provides Privacy and cloaks your IP address. 
  • Use any network (public or private or free WiFi) with encryption 
  • Login to your home or Work network from anywhere with confidence. 
  • Bypass censorship and content monitoring. 
  • Browse and bypass Firewall and censorship policy at work or Anywhere! 
  • Access region restricted services from anywhere (i.e. Youtube videos, NetFlix or BBC Player etc.) 
  • Transfer or receive files with privacy. 
  • Hide your voice/VOIP calls. 
  • Use Search Engines while hiding some of your identity. 
  • Hide yourself 
  • Cause you like to be anonymous.
Pros
  • Internet activity cannot be spied on by ISPs or governments
  • High levels of encryption (128-bit to 2048-bit)
  • All internet activity masked (once VPN set up on device)
Cons
  • More expensive than proxies - List of free web proxies
  • Can be a bit slow during peak times
  • If VPN provider keeps logs then these may be obtained by the authorities


Free VPN Services!

The notable negatives to VPN are that it is comparatively pricey, and the encryption process taxes the servers so that when in heavy use internet access through them can slow down noticeably. There are plenty of free vpn providers but i have not found a free VPN who publishes any details about the logs they keep and the circumstances under which they would hand those over to a third party.

Here i am giving you a demonstration of setting up a free vpn service on Kali Linux (Security KISS) but don't expect complete anonymity from this free vpn service.


Let's start the configuration.


Step 1: Enable VPN on Kali Linux

By default , vpn is not configured in Kali Linux. If you want to connect vpn in kali linux , first install pptp and network openvpn in Kali linux using apt-get install. for this login to Kali linux as root user and type the following command in terminal.

aptitude -r install network-manager-openvpn-gnome network-manager-pptp network-manager-pptp-gnome network-manager-strongswan network-manager-vpnc network-manager-vpnc-gnome


On some cases, you might have to restart network-manager and networking, so type the following command:

service network-manager restart


Step 2: Enable IP forwarding


Check whether IP forwarding is enabled in Linux:
cat /proc/sys/net/ipv4/ip_forward
It should return 0 or 1 (Normally it should return 1)


If it is zero (0) you need enable IP forwarding by:

echo 1 > /proc/sys/net/ipv4/ip_forward
and
gedit /etc/sysctl.conf

Now the sysctl.conf file will open up then edit the following line 26 and 27: net.ipv4.ip_forward = 1

from

# Uncomment the next line to enable packet forwarding for IPv4
#net.ipv4.ip_forward=1

to

# Uncomment the next line to enable packet forwarding for IPv4
net.ipv4.ip_forward=1

and save.


Step 3: Register on Security KISS (vpn provider)

After successfully done the above two steps now time to register on Security KISS by clicking the following link:
Type your email id then click on create button.


Open your mail and login with given client ID and password to Client Area.


Download the configuration bundle from Client area (Use the download link  generated in SecurityKISS Client Area).


Unzip the files.


Now you have 4 files named client.crt, ca.crt, client.key and README.txt.

View the README.txt file to find the list of SecurityKISS gateways (In this tutorial i am gonna use the Miami gateway, you can see i am highlighted that in the following screenshot )


Step 4: Configure OpenVPN connection

In the network connections find 'Configure VPN'


Select VPN tab and click on Add button.


Choose OpenVPN connection type and press Create button.


Now an editing window will open up, Configure the following information:

  1. Enter connection name indicating server location, protocol and port.
  2. In the Gateway field enter one of the IP address from the list you found in README.txt
  3. Authentication type should be 'Certificates (TLS)'.
  4. Click on User Certificate and navigate to unzipped config file client.crt.
  5. Click on CA Certificate and navigate to unzipped config file ca.crt.
  6. Click on Private Key and navigate to unzipped config file client.key.
  7. Put in your password for your account.


Now click on the Advanced button.

Tick 'Use LZO data compression' and 'Use custom gateway port' check boxes. 

(Enter port number according to the selected server from README.txt.)

If the server you selected from the list is marked as TCP you also need to tick 'Use a TCP connection' and click ok to save settings.


Mark Available to all users then click on save button.

Now you can see the new connection with the gateway name in the network connections manager window (see the following screenshot of mine).


Step 5: Test the tunneled connection

Connect from the VPN connections.
Go to network manager and click to VPN Connections and connect.


You can verify if your IP address has changed by opening their geographical-location website: http://www.securitykiss.com/locate


Successfully connected to the free VPN.


Final Words

VPN provides vastly improved online anonymity, and protects your entire on-line life. In addition to this, because ISPs cannot monitor your online activity, it is an effective means of bypassing ISP throttling.

VPN is secure, It allows you to bypass proxies, Firewall, monitoring and content filtering. But there’s always that drama when you’re using VPN, it sometime is slow and sometime is not that secure you’d think (Nothing in this world is 100% secure). But for countries like Iran, Pakistan, Egypt, China, North Korea etc. where content filtering is done in National Level maybe it’s a way to get the voice out.


To stay completely anonymous you should first crack a nearby access point so that your initial point of contact with the internet cannot be traced directly to you. For this I would recommend you read: How To Hack Wi-Fi WPA/WPA2 With Kali Linux

For additional anonymity you should them use proxy chains to further obscure your location. For this you should read my previous post: Kali Linux Tutorial: Setting Up ProxyChains + Tor For Anonymity And Security

There is no simple way to achieve anonymity online. Even TOR can be compromised, as the recent darknet busts have shown. If you can carry out the instructions in the two tutorials above you will be much more difficult to track than most. Hope this helps.

Tuesday 26 May 2015

Kali Linux Tutorial: Setting Up ProxyChains + Tor For Anonymity And Security

Setting Up ProxyChains + Tor For Anonymity- picateshackz.com

Hack anonymously is one of the important aspect of Information Security, if you want to conduct penetration testing on a remote computer then active connection is required which surely reveal your identity, sometimes you need to hide your identity while doing vulnerability assessment because of your anonymity and security. Proxy Chaining is a concept which is very helpful to hide an identity on the Internet.


The worst thing that can happen to any hacker is being detected by a security admin, the security technologies (IDS, firewall, etc.), or a forensic investigator.

Every time we send a packet to our intended target, that packet contains our IP address in the IP header. When we make a TCP connection, the target system will log our IP address as it logs all connections. If we set off any security alarms or alerts, our IP address will be logged. All of these events increase the possibility of detection.

In order to hack anonymously with the least chance of detection, we need to use an intermediary machine whose IP address will be left on the target system. This can be done by using proxies.

These systems are designed to accept our traffic and then forward it on to the intended target. Of course, the proxy will likely log our traffic, but an investigator would have to get a subpoena or search warrant to obtain the logs.
If we string multiple proxies in a chain, we make it harder and harder to detect our original IP address. If one of those proxies is outside the jurisdiction of the victim, it makes it very unlikely that any traffic can be attributed to our IP address.

In Kali Linux we have an excellent tool for proxying our traffic called proxychains. In this tutorial, I will show how to use this simple, but powerful tool.


Normal Proxy Vs Proxy Chaining


Normal Proxy Concept: Your Computer →Proxy Server → Target Computer


This is the concept of simple proxy, when a user uses one proxy server to hide his/her identity.

Read my previous post to know more about Proxies: Top Ten Free Proxy Websites For Anonymous Surfing


Proxy Chaining Concept: Your Computer → Proxy Server 1 +.......+ Proxy Server N → Target Computer


Now the usage of multiple proxies at a time is called Proxy Chaining, it is reliable in-terms to hide the identity. In simple words Proxy Chaning is the process to use multiple proxies in chain.


What is Proxy Chains?

The basic concept of proxy chaining is discussed now in this section we will discuss the practical aspect of Proxy Chaining, Proxy Chains (ProxyChains) is an open source program which allows you to make TCP and DNS connection by using proxy for example TOR.

TOR is not necessary for proxychains, you may use any SOCKS 4, SOCKS 5 and HTTPS proxy. There are so many advantages of Proxy Chains for example:

  • Hide identity
  • It can bypass Firewall (If you are behind a firewall or local proxy server)
  • And many more
In Kali Linux proxychains is already configured but if you are using any other version of Linux you may download it from official website. Follow the command mentioned below to get proxychains via terminal.


root@Kali:~# apt-get install proxychains


Let's start,


Step 1: Finding proxychains in Kali Linux


Type the following command in Kali:


root@Kali:~# locate proxychains

As we can see in the screenshot below, proxychains is in the /usr/bindirectory. Since /usr/bin is in our PATH variable, we can use it from any directory. This is just as we would want since we use proxychains with other commands, which may NOT likely be in the PATH variable.


Step 2: Proxychains Syntax


The syntax for the proxycahins command is simple and straightforward.


root@Kali:~# proxychains <the command you want proxied> <any arguments>

So, if I wanted to use proxychains to scan a site with nmap anonymously, I could type:


root@Kali:~# proxychains nmap -sS <IP address>

Step 3: Set Up the Config File


Now it is time to configure proxychains, there are two options that can be used whether use nano to edit config file on terminal and the other option is to use your favorite editor, both commands are mentioned below.

root@kali:~# nano /etc/proxychains.conf 
--OR--
root@kali:~# sudo gedit /etc/proxychains.conf

When we do so, we will see a file like that displayed below. If we scroll down this file a bit, we will see a section that I have highlighted labeled "add proxy list here...".


To get proxychains to use intermediary proxies, we simply need to add the IP addresses of the proxies we want to use here. It's important to note that proxychains defaults to use Tor.

Notice the last line in the screenshot above. It directs proxychains to send the traffic first through our host at 127.0.0.1 on port 9050 (the default Tor configuration). If you are using Tor, leaves this as it is. If you are not using Tor, you will need to comment out this line.


Step 4: Let's Test It


Now that we have put a proxy between us and any traffic we send, let's test it out. In this case, I am simply going to do an nmap scan mytestsite.com anonymously by sending the scan through a proxy. The command would be as follows:


root@kali:~# proxychains nmap -sS 8.26.65.101


As you can see in the screenshot above, I have successfully scanned
mytestsite.com through my chosen proxy and returned the results back to me. In this way, it appears that my proxy scanned mytestsite.com and not my IP address.

Step 5: Add More Proxies


First, let's add some more proxies to our list.  

Type the following command:

root@kali:~# sudo gedit /etc/proxychains.conf

Then add more proxy IPs like I've done below.


Step 6: Proxychaining


Now that we have multiple IPs in our proxychain.conf we can set up dynamic chaining. Dynamic chaining will enable us to run our traffic through every proxy on our list, and if one of the proxies is down or not responding, it will automatically go to the next proxy in the list without throwing an error.

To do so, let's first open the proxychains configuration file again.


root@kali:~# sudo gedit /etc/proxychains.conf

With this file open, uncomment out the "dynamic_chains" line. This will enable dynamic chaining of our proxies allowing for greater anonymity and trouble-free hacking.


Step 7: Random Chaining


Finally, we can also use "random chaining". With this option, proxychains will randomly choose IP addresses from our list and use them for creating our proxychain. This means that each time we use proxychains, the chain of proxy will look different to the target, making it harder to track our traffic from its source.

To do so, open the /etc/proxychains.conf file and comment out "dynamic chains" and uncomment "random chain". Since we can only use one of these options at a time, make certain that you comment out the other options in this section before using proxychains.

In addition; you may want to uncomment the line with "chain_len". This will determine how many of the IP addresses in your chain will be used in creating your random proxy chain.


Now that you know how to use proxychains, you can do your hacking with relative anonymity. I say relative, because there is no surefire way to remain anonymous with the NSA spying on all our activity. All we can do is make detection MUCH harder, and proxychains can help do this for us.


Recommended article: How To Setup Free VPN Service On Kali Linux For Anonymity