Showing posts with label Technology. Show all posts

Thursday, 2 July 2015

A Brilliant Idea to Anonymously Access Wi-Fi from 2.5 Miles Away

Anonymously-wifi-miles-away- picateshackz.com


Anonymity is something that seems next to impossible in this era of government surveillance. Even Tor and VPNs are no longer seem to be enough to protect user privacy. Once your IP address is discovered, your Game Over!


However, a method have been devised that not only allow users to anonymously connect to public Wi-Fi network, but also let them connect from about 2.5 Miles away.


Security researcher Benjamin Caudill has developed a device that adds an extra layer of anonymity to whistleblowers, journalists, dissidents and, of course, criminals.


Dubbed ProxyHam, it's a "hardware proxy" that allows users to connect to a long-distance public Wi-Fi network over an unidentifiable low-frequency radio channels, making it more difficult for government agencies and spies to unearth the real identity and source of the Internet traffic.

How Proxyham is made?


Proxyham is comprised of a WiFi-enabled Raspberry Pi computer, along with a three antennas setup. One antenna is used to connect to a source Wi-Fi network at a public place, and the other two antennas are used to transmit the Wi-Fi signal at a 900 MHz frequency.


By relying on a 900 MegaHertz radio connection, ProxyHam effectively connects to a far-away Wi-Fi, with a range of between 1 and 2.5 Miles, depending upon certain interference factors.


Therefore, in case if spies manage to completely trace the target's internet connection, they will find only the IP address of ProxyHam box transmitting a low-level radio signal thousands of feet away in some direction.


Caudill tells Motherboard that he and his colleagues are also working to add additional features like self-destruction to the ProxyHam. Future iterations might be small enough as to fit Proxyham into a book to make it easier to hide.

"If you throw this in a library it would take you years to be able to identify it," Caudill said.

Caudill will unveil this game changer ProxyHam box at the Def Con hacker conference in Las Vegas next month. He will also release the hardware specs, the source code and the blueprint of the device so that anyone can develop their own.


Caudill is planning to sell ProxyHam at cost for $200, "as a service to the community," and he also hopes that he’ll be able to drop the price to $150 soon.


Source: www.thehackernews.com


Saturday, 27 June 2015

Benefits Of Rooting Android Devices And How To Root Without Computer

Root_android_easily & benefits - picateshackz.com

To root or not to root? It's a question that most people don't ever ask themselves, because Android devices are powerful and customizable from the get-go, and rooting can be risky.

But it's not that risky. And if you want to really unlock the full potential of your device—if you want to be able to control everything, backup everything, customize everything, and do all sorts of fun things like install custom ROMs and get Android Lollipop ahead of the pack—you'll need to root your phone.

I'm not saying you have to root your Android device…but I am saying you might be a goody two-shoes if you don't.

Benefits of Rooting Android Devices

Automate everything

Powerful root-only apps like Tasker can turn your dream of a super-smartphone into a reality. Tasker uses the "if this, then that" mentality to make your phone a genius -- for example, you can use Tasker to automatically silence your phone at night, turn on your Wi-Fi when you're at home, or open up an app when you connect to your car's Bluetooth.

Lollipop, here I come!

Android phone makers have a habit of not releasing updates in a timely manner. Or at all, sometimes. So why are you still waiting for the latest OS when you could simply root your phone and get it right now? Patience is for people who don't know how to root.

Faster than the speed of…your CPU

Contrary to what the phone-makers want you to believe, your Android device could definitely be faster. And you can take speed matters into your own hands with apps like SetCPU, which is only available after you root. What's a little battery life lost when you have more power?

Better battery life

You know how you can overclock your device's CPU for ultra-speedy app-switching (who doesn't want to multitask like Sonic the Hedgehog)? Well you can also use SetCPU to underclock, or slow down, your CPU for when you need that extra 29 minutes of battery life.

Bye-bye, bloatware

Nuking factory-installed bloatware beats disabling it any day.

Really, really back up your stuff

OK, so Google does a pretty good job of keeping your mail, contacts, calendar, apps, and other Google-y things in order. But if you want to truly backup everything, as in, if you want to take a literal snapshot of your device and stick it somewhere safe, you'll need the root-onlyTitanium Backup. Satisfy your hoarding tendencies!

Customize all the things!

Android is pretty customizable, even without rooting your phone. But with a root you can literally customize everything. Vibration strength? Precise screen color calibration? Gesture control? There's a (root-only) app for that.


Store apps wherever the hell you want to

Use a root-only app like FolderMount to store apps, not just files, on your microSD card. Now your device has infinite (read: 128GB) of real usable storage!


Rooting your Android Device gives you Super User access for your mobile by rooting your android device even you can uninstall built-in apps, now i am going to show you 2 easy ways to root your android device easily without computer.


Method 1:(Framaroot)

Framaroot is android app it can easily root your android device now its not available in play store so click here to download the app and install it.


android_easy root_picateshackz

After installing open the app and choose Install Supersu from drop down menu show above.

android_easy root_picateshackz
It show number of exploit methods to root your android device choose anyone of the method my first preference is Boromir if it fails try other exploit methods.


android_easy root_picateshackz


Within seconds it show the result after that you need to restart your device to install Supersu which manage root access and you need net connection to download it.


UnRoot

If you need to unroot your android device simply select Unroot option from the drop down menu of framaroot give below.


android_easy root_picateshackz

This method help to root and unroot your android device in easy way it mostly works for most of the android device if it not works follow the method 2.


Method 2:(Kingroot)


Kingroot app gives you to one touch root access, Click here  to download the app.


Install and open the Kingroot app.


android_easy root_picateshackz


Tap the START ROOT option to root your android device the rooting process is like given below.


android_easy root_picateshackz

After rooting you will get the confirmation screen like given below.

android_easy root_picateshackz


Now your android device is rooted enjoy the superuser access on your android..........


Sunday, 31 May 2015

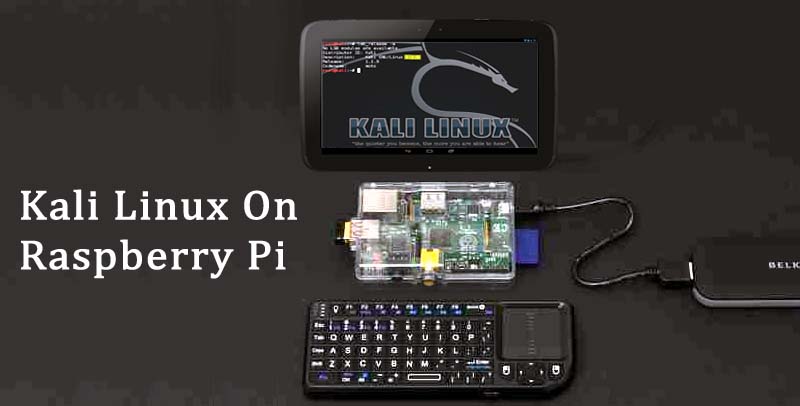
Setup Kali Linux In Raspberry Pi And Android Device As Screen & Input

Kali Linux In Raspberry Pi And Android Device As Screen & Input- picateshackz.com

Before we begin, Let me give you an introduction about what is inside this article. as the title said it is all about Raspberry Pi, a Raspberry Pi is a low budget (30$), small credit-card sized ARM board that acts as a computer, and it can connect to TV, Laptop screen and desktop monitor. The Pi is popular among hobbyists and educators due to its low cost, simplicity, and versatility of applications, So how it will useful for Penetration testing or Ethical hacking by installing hacker's OS Kali Linux on it. well, this complete step by step guide will teach you how to install Kali linux in Rapberry Pi and how to use an Android device as its screen and input.


What is Raspberry Pi?


The Raspberry Pi is a low cost, credit-card sized computer that plugs into a computer monitor or TV, and uses a standard keyboard and mouse. It is a capable little device that enables people of all ages to explore computing, and to learn how to program in languages like Scratch and Python. It’s capable of doing everything you’d expect a desktop computer to do, from browsing the internet and playing high-definition video, to making spreadsheets, word-processing, and playing games.


What’s more, the Raspberry Pi has the ability to interact with the outside world, and has been used in a wide array of digital maker projects, from music machines and parent detectors to weather stations and tweeting birdhouses with infra-red cameras. We want to see the Raspberry Pi being used by kids all over the world to learn to program and understand how computers work.


Installing Kali Linux 1.1.0 on the Raspberry Pi 2


There is no official Kali support for the Raspberry Pi 2 with working images, and Kali 1.1.0 support, I wanted to find out if it was possible to get Kali 1.1.0 working on the latest Raspberry Pi 2 and the steps needed.

The Raspberry Pi 2 is small and low powered enough to be used as a penetration testing "drop box". It's a simple but fairly powerful device that can be inconspicuously plugged into a network and provide a penetration tester with the means to perform remote tests.

Specifications


Raspberry PI 2

The Raspberry PI 2 has significantly improved specifications compared to the Raspberry PI model B+, being approximately six times faster and having twice the memory.

The quick specifications are:-

900MHz quad core ARM Cortex-A7 CPU (~6x performance)

1GB RAM

4 port USB

10/100 Ethernet port.


Kali Linux 1.1.0

Kali Linux 1.1.0 was released on the 9/2/2015, and was described as a milestone release. With a new kernel patched for Wireless injection attacks, and improved wireless driver support.

Building a Kali Linux 1.10 image for the Raspberry Pi 2

A sample workflow would look similar to (armhf):


And slightly modified the workflow to the below:-

mkdir ~/arm-pi2
cd ~/arm-pi2
git clone https://github.com/offensive-security/gcc-arm-linux-gnueabihf-4.7
export PATH=${PATH}:/root/arm-pi2/gcc-arm-linux-gnueabihf-4.7/bin
git clone https://github.com/offensive-security/kali-arm-build-scripts
cd ~/arm-pi2/kali-arm-build-scripts 


Then download the Raspberry Pi 2 kernel configuration, to the current folder (kali-arm-build-scripts) using the following command:-

wget http://pastebin.com/download.php?i=Rv3zpsiv -O pi2_kernel.config


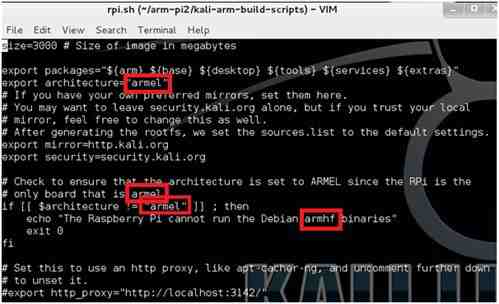
Then modify the rpi.sh script as below:-


Replacing "armel" above with "armhf" as below, as the Raspberry PI uses the armhf architecture.


Then continue to modify the rpi.sh file to load the new kernel configuration as below, and then save the modified rpi.sh to disk. (with vi :wq).


Then ran./build-deps.sh

And built the image using version 1.1.0 of Kali Linux:

./rpi.sh 1.1.0


The image file kali-1.1.0-rpi.img,xz was produced:-


For the next steps i am used a Windows laptop with a built in SD card reader, to write the created img to a high capacity SDHC card.

Extract the xz file to an img file using the Windows 7-zip program, and then use "Win32 Disk Imager" to write the img to the SDHC card. 


The Linux equivalent would be to use the unxz utility to decompress the xz file, followed by a similar command:

 - dd if=kali-1.1.0-rpi.img of=/dev/sdb bs=512k


Configuring Kali Linux on the Raspberry Pi 2.


Expanding the image to the size of the flash card

Insert the written SDHC card in the Raspberry Pi 2, and made the other necessary connections like attaching a keyboard/monitor/mouse and plugging a DHCP enabled network cable into the Raspberry Pi. And then powered the Raspberry Pi up, logging in using the default credentials root/toor:- (we suggest changing the password).


As i wanted to use the full flash SD card size, as the full kali Linux build which i want to install is too big for the default image, So i am then expanded the image to the full size of the flash SD card, using the following commands :
/scripts/rpi-wiggle.sh
However the sudo and parted programs were missing, so we had to use apt-get to install them:-
apt-get install sudo
apt-get install parted
Then the rpi-wiggle.sh program was able to run:-
/scripts/rpi-wiggle.sh

After this the Raspberry Pi will be reboot, Now ready for the full Kali build to be installed.

Installing the Full Kali Linux build


Now it is time to install the full Kali Linux build, by issuing the following commands:-

apt-get update
apt-get install kali-linux-full

After downloading and installing files, and answering a number of configuration screens, the installation will be completed and the command prompt will display:


Installing and configuring the SSH server


The next step is install and configure the SSH server. Though chkconfig first:

apt-get install chkconfig
Then remove the run levels for SSH:
update-rc.d -f ssh remove
And then load the SSH defaults to run level:
update-rc.d -f ssh defaults
Next, check that the SSH server was up and running:
chkconfig ssh
I suggest removing the default keys for the SSH server:
rm /etc/ssh/ssh_host_*
Then create a new set of public and private keys:
dpkg-reconfigure openssh-server
Now restart the SSH server:
service ssh restart

You are done. 

Note: I am used a SDHC for compatibility sake, which limited me to a maximum capacity of 32GB. Where possible select cards which have wear levelling, which distributes the writes across the memory, extending the life of the flash media. Finally i am used high speed media, selecting manufacturers from a published Raspberry Pi compatibility guide http://elinux.org/RPi_SD_cards


Use Android Device as Screen and Input for Raspberry Pi


Got an Android device? Want to use it as a screen and keyboard for Raspberry Pi? A simple trick described in a thread on the Raspberry Pi forum site can help you with that.

For this trick to work, you need an Android device that supports USB tethering and VX ConnectBot app installed on it.


What this does:

1. Allows you to use your Android device as keyboard input and terminal display for your Raspberry Pi

2. Allows you to tether your Raspberry PI to your Android device's WiFi (3G untested, but should work).


Assumptions:
  • Your PI is configured to run SSHd on startup
  • You are using the default Pi username / password
  • Your Android device has internet connectivity via WiFi/3G and it is enabled

How to do it:


On Raspberry Pi, run the sudo nano /etc/network/interfaces command, and add the following configuration to it:
iface usb0 inet static address 192.168.42.42 netmask 255.255.255.0 network 192.168.42.0 broadcast 192.168.42.255
This effectively turns the first USB port into a network interface. Reboot Raspbery Pi.

Now follow the steps:

1. Power down your Pi

2. Connect your Android device to your Pi via it's USB data cable

3. Power up your Pi... wait about a minute.

4. On your Android device, go to Settings / Wireless & Networks / More / Tethering & Portable Hotspot... click "USB tethering"

5. Start up VX ConnectBot and SSH "pi@192.168.42.42"

6. Keep hitting return until it asks you for your password. Enter it.

Congratulations - you should now have terminal access to your Pi with a software keyboard... kinda. Mine seems to disconnect the session every minute or so - very annoying.

Now to set up routing so that your Pi can see the world via your Android device.

7. Root yourself up

sudo su -


8. Check to see which IP address that your Android device is using
arp -a
mine is 192.168.42.129

9. Add a default route pointing all traffic from your Pi out to your Android device. It's worth noting that this static route is temporary and will not survive rebooting your Pi. I've left it like this because I don't know if Android likes to change it's tether gateway address very often. 

If you've gotten this far, I'll assume you can figure out how to make a static route permanent if need be..
route add default gw 192.168.42.129 usb0

10. Test it!
ping http://www.google.com

Top Android Apps For Advanced Usability With Raspberry Pi 


Ever found yourself plugging a keyboard into your Raspberry Pi because you could be bothered to boot your PC to SSH, or found yourself desperately trying to remember the tiny computer’s IP address on your network?

There are a whole host of Android utilities that can be used by Raspberry Pi owners to make life easier, including a couple that are custom designed.

I have collected some of them together, all of which are free to install to Android phones and tablets.


Hacker’s Keyboard

The standard Android keyboard isn’t really any good for entering command line instructions (something you’ll probably need to do if connecting over SSH to your Raspberry Pi device) which is where the Hacker’s Keyboard comes in handy. Arguably more useful on devices with a larger screen or tablets, this app offers a standard keyboard layout for Android, with all of the characters — alpha-numeric and punctuation — where you would expect to find them.

muo-android-pi-apps-kb
Also featuring Tab, Ctrl, Esc, and arrow keys, Hacker’s Keyboard will probably prove vital for communicating with your Pi from your Android phone or tablet. At the very least it should save you some time. Many international keyboard layouts are included, while the developer has also provided international dictionaries as optional plugins should you wish to use Hacker’s Keyboard more widely.

AndroidVNC

Rather than sending files by FTP or gaining command line access through SSH, what if you needed to setup a remote connection to the GUI in Raspbian or some other Pi distro?

muo-android-pi-apps-vnc
To start with, you would need to have TightVNC installed on your Raspberry Pi. This will accept the connection, but to get a reproduction of your Raspberry Pi desktop on your Android device, you’ll need AndroidVNC.

With a keyboard and a settings screen to manage how the mouse behaves and to send special keys (such as CTRL-ALT-DEL), AndroidVNC simplifies what might otherwise be a complicated mess of options. Not so great for smaller screens, AndroidVNC is perfect for phablets and tablets.

Fing


  • You’ve just switched on your Raspberry Pi but you forgot to connect the HDMI lead, so you have no display. You don’t want to pull the plug, but you can’t ssh into it without the ip address. How to find it? Or…
  • You got your headless Raspberry Pi up and running, but you forgot what ip address it’s on. Or…
  • You rebooted your internet router and it’s changed the ip address of the Pi. What do you do?

You install Fing on your phone and use it to scan your whole network and tell you the ip and mac addresses of every connected device.

Very useful indeed. There’s no looking back once you’ve got Fing installed. It’s a superb app. You can assign names to each device and choose an appropriate icon to make identification easier. They recently added a Raspberry Pi icon too…