Friday 30 January 2015

How to Hack Website Using Sql Map in Kali Linux - Sql Injection


In this tutorial i'm going to explain how to hack a website using sql map,  sqlmap is an open source penetration testing tool that automates the process of detecting and exploiting SQL injection flaws and taking over of database servers. This tool is available in Kali Linux (Hacker's Os).


Let's start with Kali Linux,


Kali Linux


First off, you need to have Kali linux (or backtrack) up and running on your machine. Any other Linux distro might work, but you'll need to install Sqlmap on your own. Now if you don't have Kali Linux installed, you might want to go to this page: An Introduction to Hacker's OS Kali Linux and Installation Tutorial

Suggest you to read: Kali Linux Tutorial: Find Vulnerabilities for Any Website Using Nikto


Sqlmap


Basically its just a tool to make Sql Injection easier. Their official website  introduces the tool as -"sqlmap is an open source penetration testing tool that automates the process of detecting and exploiting SQL injection flaws and taking over of database servers. It comes with a powerful detection engine, many niche features for the ultimate penetration tester and a broad range of switches lasting from database fingerprinting, over data fetching from the database, to accessing the underlying file system and executing commands on the operating system via out-of-band connections."
A lot of features can be found on the SqlMap website, the most important being - "Full support for MySQL, Oracle, PostgreSQL, Microsoft SQL Server, Microsoft Access, IBM DB2, SQLite, Firebird, Sybase and SAP MaxDB database management systems." That's basically all the database management systems. Most of the time you'll never come across anything other than MySql. 

Hacking Websites Using Sqlmap in Kali linux

Sql Version


Boot into your Kali linux machine. Start a terminal, and type -
sqlmap -h
It lists the basic commands that are supported by SqlMap. To start with, we'll execute a simple command
sqlmap -u <URL to inject>. In our case, it will be-

sqlmap -u http://testphp.vulnweb.com/listproducts.php?cat=1
Sometimes, using the --time-sec helps to speed up the process, especially when the server responses are slow.
sqlmap -u http://testphp.vulnweb.com/listproducts.php?cat=1 --time-sec 15
Either ways, when sqlmap is done, it will tell you the Mysql version and some other useful information about the database.


answered in yes/no. Typing y means yes and n means no. Here are a few typical questions you might come across-
  • Some message saying that the database is probably Mysql, so should sqlmap skip all Note: Depending on a lot of factors, sqlmap my sometimes ask you questions which have to be other tests and conduct mysql tests only. Your answer should be yes (y).
  • Some message asking you whether or not to use the payloads for specific versions of Mysql. The answer depends on the situation. If you are unsure, then its usually better to say yes.
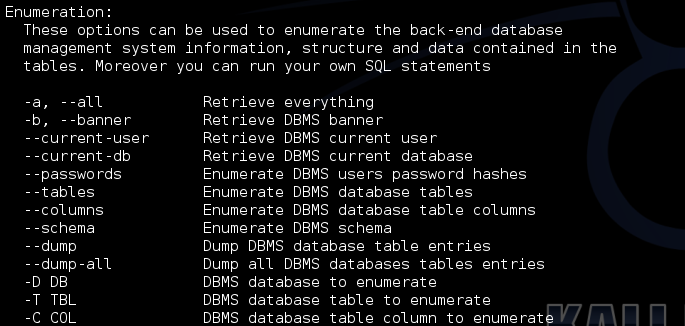
Enumeration

Database

In this step, we will obtain database name, column names and other useful data from the database.


So first we will get the names of available databases. For this we will add --dbs to our previous command. The final result will look like -
sqlmap -u http://testphp.vulnweb.com/listproducts.php?cat=1 --dbs

So the two databases are acuart and information schema.

Table

Now we are obviously interested in acuart database. Information schema can be thought of as a default table which is present on all your targets, and contains information about structure of databases, tables, etc., but not the kind of information we are looking for. It can, however, be useful on a number of occasions. So, now we will specify the database of interest using -D and tell sqlmap to enlist the tables using --tables command. The final sqlmap command will be-
sqlmap -u http://testphp.vulnweb.com/listproducts.php?cat=1 -D acuart --tables
The result should be something like this - 


Now we have a list of tables. Following the same pattern, we will now get a list of columns.

Columns

Now we will specify the database using -D, the table using -T, and then request the columns using --columns. I hope you guys are starting to get the pattern by now. The most appealing table here is users. It might contain the username and passwords of registered users on the website (hackers always look for sensitive data).
The final command must be something like-
sqlmap -u http://testphp.vulnweb.com/listproducts.php?cat=1 -D acuart -T users --columns

The result would resemble this-


Data

Now, if you were following along attentively, now we will be getting data from one of the columns. While that hypothesis is not completely wrong, its time we go one step ahead. Now we will be getting data from multiple columns. As usual, we will specify the database with -D, table with -T, and column with -C. We will get all data from specified columns using --dump. We will enter multiple columns and separate them with commas. The final command will look like this.
sqlmap -u http://testphp.vulnweb.com/listproducts.php?cat=1 -D acuart -T users -C email,name,pass --dump

Here's the result


You are done,

John Smith, of course. And the password is test. Email is email@email.com?? Okay, nothing great, but in the real world web pentesting, you can come across more sensitive data. Under such circumstances, the right thing to do is mail the admin of the website and tell him to fix the vulnerability ASAP. Don't get tempted to join the dark side. You don't look pretty behind the bars. That's it for this tutorial. Try to look at other columns and tables and see what you can dig up, Thank you.

Wednesday 28 January 2015

How to Easily Root Your Nexus 7 Tablet Running Android (Windows Guide)

The new Jelly Bean is out in the wild, but if you've installed Android 4.3 from stock, you'll notice rooting is now not possible. If you miss the ad-blocking capabilities of AdBlock Plus, how Seeder made apps snappier, or the convenience of backing up with Titanium Backup, you'll need to get rooted.
Thankfully, there's a new rooting method for Android Jelly Bean 4.3 to get you softModded. Let's jump right in.

Step 1: Enable USB Debugging

Begin by enabling "USB debugging" on your Nexus 7. This is the most important step because the toolkit we'll use in a later step will automate everything for you.
Enable "USB debugging" by going to Settings -> Developer Options -> USB Debugging.


If you don't see the Developer Options, go to Settings -> About Device and tap your device Build Number repeatedly until these options unlock.

Step 2: Download SuperSU

On your tablet, head over to this link on Chainfire to download the latest version of SuperSU. We'll be manually flashing the root files using a custom recovery.
Next, head over to your PC, and plug in your Nexus 7 tablet.

Step 3: Download & Install Wugs Nexus Toolkit

Yep, it's every softModder's favorite toolkit for the Nexus 7 (or any Nexus device for that matter). If you haven't already installed WugFresh's Nexus Root Toolkit (we installed when manually updating to Jelly Bean 4.3), you can grab the newest version over at the official WugFresh website.
For those who don't know, a toolkit has all the tools and drivers needed to do any softModding job. Whether it's rooting, bootloader unlocking, ROM flashing, or restoring—a toolkit does it all, with ease and simplicity.

Step 4: Set Up the Toolkit

Install the toolkit like you would any other Windows program (sorry, this will not work for Mac users). Launch the toolkit when done and a window will pop up asking for your device model. Choose your device from the list along with its OS version (any build) and click "Apply."
Currently, Wugs Nexus Root Toolkit hasn't been updated to root 4.3, so we'll just be doing it manually.
Now, Head over to "Initial Setup" and click "Full Driver Installation...."
Follow the guide provided in the toolkit to install the required drivers for your Nexus 7. I recommend "Driver Solution #3," but any of the three options should work. The toolkit has a built-in guide with pictures that will aid you in installing the drivers.
Installing drivers properly is the most important step (aside from making sure USB Debugging is turned on, of course).

Step 5: Unlocking the Bootloader

Click on "Unlock" to unlock the bootloader. Everything will be automated, so just follow its lead.

WARNING

THIS DELETES EVERYTHING ON YOUR NEXUS 7! So, make sure you backup before continuing, unless you don't mind a fresh start.

Step 6: Getting Rooted

Afterwards, tap "Launch" under Advanced Utilities.
A new window will appear. Tap "Boot Custom Recovery Temporarily."
Give it a few moments and your tablet will automatically launch the TWRP recovery. Use TWRP to flash the ZIP file downloaded earlier.
  • Tap Install
  • Tap the SuperSU ZIP file
  • Swipe to confirm flash
  • Tap Reboot
Once your tablet is fully booted up, open the app drawer and you'll find SuperSU, which gives you superuser access to your Nexus 7 tablet.
Your tablet is now fully rooted and ready for any softMods you throw at it. Whether it's installing a custom ROM, flashing a different custom recovery, or taking full advantage of the wide range of apps that require root, you're now ready for all of what Android has to offer.

How to Spy on a Cell Phone - Mobile Spy Software


Every day I get a lot of emails from people asking how to spy on cell phone or How to hack a cellphone. To spy on a given cell phone all you need to do is install a good cell phone spy software on the target cell phone and once you do this you can silently record every SMS and information about each call. You can also see GPS positions every thirty minutes.

There exists many cell phone spy softwares on the market and hence people often get confused about which cell phone spy software to go for. To make this job simpler for you we personally tested some of the top cell phone spy softwares and based on the results we conclude Mobile Spy as one of best one.

Why Mobile Spy?

Mobile Spy is one of the best and award winning cell phone spy softwares on the market with an affordable price. Mobile Spy team provides an excellent support and hence it becomes just a cakewalk to spy on your favorite cell phone! Today with an excessive usage of cell phones by many teenagers it becomes necessary for their parents to perform cell phone spying.

Using the Internet capabilities of your phone, recorded activities, logs and GPS locations are quickly uploaded to your Mobile Spy account. To view the results, you simply login to your secure account at the Mobile Spy web site. Logs are displayed by categories and sorted for easy browsing.


How it works?

Mobile Spy is a hybrid software/service which allows you to monitor your smartphone in real time. This unique system records the activities of anyone who uses your compatible iPhone, BlackBerry, Android, Windows Mobile or Symbian OS smartphone. You install a small application directly onto the phone you own & want to monitor. It starts at every boot of your phone, but remains stealth and does not show up in the running process list.

After the software is setup on the monitored phone, it will record an array of phone activities and then silently upload the data to your private Mobile Spy account using the Internet. When you want to view results, simply login to the Online Control Panel from any computer and enter your username and password to proceed.

This high-tech spy software will allow you to see exactly what they do while you are away. Are your kids texting while driving or using the phone in all hours of the night? Are your employees sending company secrets? Do they erase their phone logs? That won't matter because the software does not rely on the phone's internal logging system.


Mobile Spy Features:

  • Call Log
Each incoming and outgoing number is logged along with duration and time stamp.
  • SMS (Text Messages) Log
Every text message is logged even if the phone's logs are deleted. Includes full text.
  • GPS Locations Log
GPS postions are uploaded every thirty minutes with a link to a map.
  • Contacts
Every contact on the phone is logged. New contacts added are also recorded.
  • Tasks
All personal tasks that are created are logged and viewable.
  • Memos
Every memo input into the phone is logged and viewable.
  • Cell ID Locations
ID information on all cell towers that the device enters into range of is recorded.
  • E-Mail Log
All inbound & outbound email activity is logged. Emails are viewable in their entirety.
  • Calendar Events
Every calendar event is logged. Date, time, and locations are recorded.
  • URL (Website) Log
All URL website addresses visited using the phone's browser are logged.
  • Photo & Video Log
All photos & videos taken by the phone are recorded & are viewable.


Log Summary

A summary of all activities can be shown along with separate viewers for each type.
The working of Mobile Spy is very simple and needs no extra knowledge to install and use.

Step 1- After you purchase Mobile Spy you’ll get a link to download the software. Along with this you’ll get a username and password for you online control panel.

Step 2- Install the downloaded cell phone spy software onto the target cell phone that you want to spy on. After the installation, spy software starts recording all the activities on the cell phone.

Step 3- Login to your online control panel to see the logs containing the recorded information.
Mobile Spy is fully compatible with the following cell phones

  1. BlackBerry Phones
  2. Android Phones
  3. Apple iPhones
  4. Windows Mobile Phones
  5. Symbian OS 9.x and 8.x phones

Click Here for the Complete List of Compatible Phones.

So what are you waiting for? Go grab Mobile Spy now and start spying on any cell phone within hours. Visit the following link to order Mobile Spy Now!


Tuesday 27 January 2015

Simple Cool Tricks With Chrome Developer Tool

chrome developer tool- picateshackz.com

As you probably know, there is a button on the right-click menu of Google Chrome and IE 10+ called ''Inspect element''. This the developer tool. And you can have a lot of fun with it. I'll give you two examples on how to use it in this tutorial.


1. Change the text of a webpage:

You can have fun on webpages just by changing the value of a <span> (a text label). For example, go on the 4shared.com site (a free file sharing site). Then create an account if you don't have one (or just connect with Google, Facebook or Twitter). When you are done, upload something that is heavy (more than 100 MB) by dragging and dropping it on the home page of 4shared. Then you can see an uploading status window on the screen. So right-click on the percentage and click on ''Inspect element''. Now you can see a little window that appears on the bottom of the web browser. There are to ways : either you got the number or you got the % symbol. If you got the number, try to find the symbol below. Then double-click on it and type what you want (Eg: '',000,000 dollars in my bank account'')

google chrome tricks

2. Get a Non-Crypted password in JS/PhP code:

Some sites are not very safe and just verify the password directly in the PhP/JS code. Then, even if it become rare, you can get the password. Just follow these steps :
  1. Find the login form on the website you want to hack
  2. Right-click on it and then click on ''Inspect element''
  3. Search on the window that appeared ''<form'' and then ''action=''
  4. After it, there is a URL, If it ends by ''.js'', just copy it and paste it in the URL bar of your browser
  5. If it ends by ''.php'', type ''view-source:'' before pasting the URL
  6. Then search something like ''password'' in the code.
WARNING: This method works better with JS than with PHP. Sometimes, there is no URL after ''action='' but just a JS function. Then you have to press Ctrl+U to see the source and search for ''password'' in the whole code.

Monday 26 January 2015

How to Crack Online Passwords Using THC-Hydra in Kali Linux

crack online_thc hydra_kali linux- picateshackz.com

There is tool that is excellent for cracking online passwords and it is called THC-Hydra. Fortunately, it is built into our Kali distribution, so we don't need to download, install, or compile anything to use it.


Step 1: Download & Install Tamper Data

Before we start with THC-Hydra, let's install another tool that complements THC-Hydra. This tool is known as "Tamper Data", and it is a plug-in for Mozilla's Firefox. Since our IceWeasel browser in Kali is built on the open source Firefox, it plugs equally well into Iceweasel.
Tamper Data enables us to capture and see the HTTP and HTTPS GET and POST information. In essense, Tamper Data is a web proxy similar to Burp Suite, but simpler and built right into our browser.
Tamper Data enables us to grab the information from the browser en route to the server and modify it. In addition, once we get into more sophisticated web attacks, it is crucial to know what fields and methods are being used by the web form, and Tamper Data can help us with that as well.
Let's download it from here and install it into Iceweasel.


Step 2: Test Tamper Data

Now that we have Tamper Data installed into our browser, let's see what it can do. Activate Tamper Data and then navigate to any website. Below you can see that I have navigated to Bank of America and Tamper Data provides we with each HTTPS GET and POST request between my browser and the server.

When I try to login to the site with the username "hacker", Tamper Data returns to me all the critical info on the form. This information will be useful when we begin to use Hydra to crack online passwords.


Step 3: Open THC Hydra

Now that we have Tamper Data in place and working properly, let's open Hydra. You can find it at Kali Linux -> Password -> Online Attacks -> Hydra. You can see it about midway among the list of online password cracking tools.

Step 4: Understand the Hydra Basics

When we open Hydra, we are greeted with this help screen. Note the sample syntax at the bottom of the screen. Hydra's syntax is relatively simple and similar to other password cracking tools.
Let's take a look at it further.
hydra -l username -p passwordlist.txt target
The username can be a single user name, such as "admin" or username list,passwordlist is usually any text file that contains potential passwords, andtarget can be an IP address and port, or it can be a specific web form field.
Although you can use ANY password text file in Hydra, Kali has several built in. Let's change directories to /usr/share/wordlists:
kali > cd /usr/share/wordlists
Then list the contents of that directory:
kali > ls
You can see below, Kali has many word lists built in. You can use any of these or any word list you download from the web as long as it was created in Linux and is in the .txt format.

Step 5: Use Hydra to Crack Passwords

In the example below, I am using Hydra to try to crack the "admin" password using the "rockyou.txt" wordlist at 192.168.89.190 on port 80.

Using Hydra on Web Forms

Using Hydra on web forms adds a level of complexity, but the format is similar except that you need info on the web form parameters that Tamper Data can provide us.
The syntax for using Hydra with a web form is to use <url>:<formparameters>:<failure string> where previously we had used the target IP. We still need a username list and password list.
Probably the most critical of these parameters for web form password hacking is the "failure string". This is the string that the form returns when the username or password is incorrect. We need to capture this and provide it to Hydra so that Hydra knows when the attempted password is incorrect and can then go to the next attempt.